Work Order Templates Guide
How to access, create, and edit work order templates
In order to create a work order, a template must be created previously. In this article, we will explain how to access, manage and create these templates
| 1. Access and manage templates |
| 1.1. How to access templates? |
| 1.2. How to manage templates? |
| 2. Create and edit templates |
| 2.1. How to create a new template? |
| 2.2. How to edit a template? |
| 2.2.1. Create tasks |
| 2.2.2. Create task groups |
| 2.2.3. Task settings |
| 2.2.4. Add questions and instructions to tasks |
| 2.2.5. Edit images |
| 2.2.6. Define conditional answers |
| 3. Template settings |
1. Access and manage templates
1.1. How to access templates?
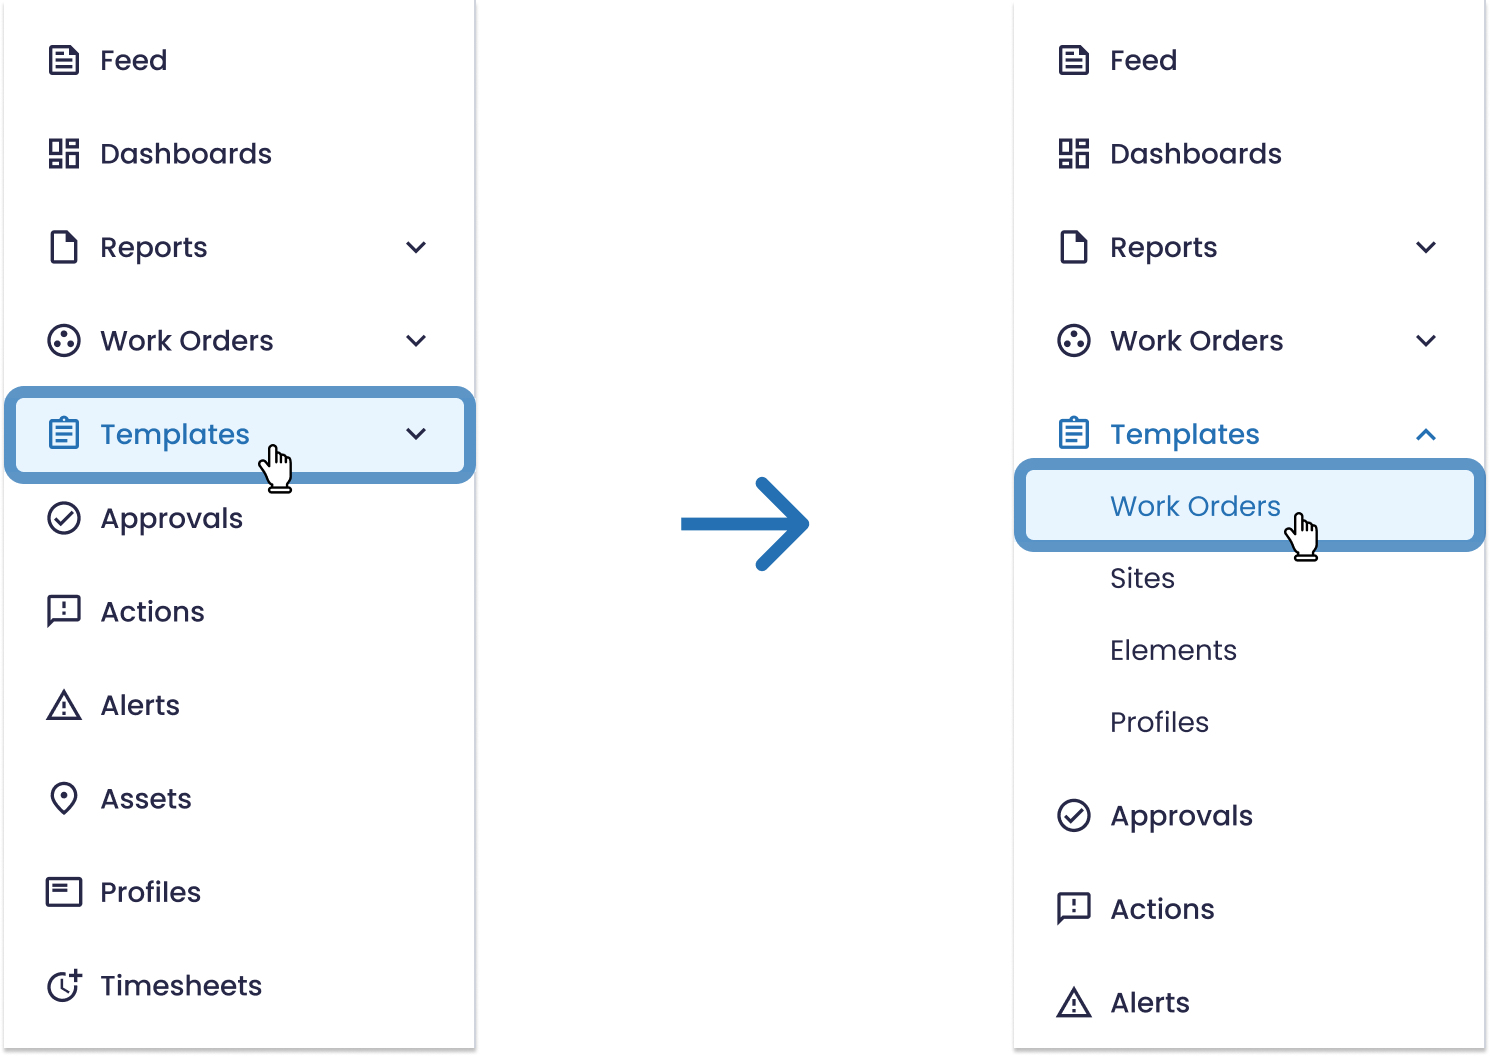
To access the work order templates menu go to the main menu and select the "Templates" tab. Then, inside that category choose "Work Orders".
The work order templates window will open and there you will be able to see all the template folders already created (if you have already created any).
If you want to access a particular template, just click on the folder it's in.

Within each folder, you can have several templates. Choose the template you want and hover over it with your mouse and an edit icon will appear in front of the template.

Click on the icon to open your template builder.

Here you can edit your template title, tasks, questions, rules, materials, and overall settings.
Just make sure you click "Save" in the bottom right corner of the page when you've finished editing your template.
1.2. How to manage templates?
On this page, in addition to being able to open the template, you can also duplicate or archive a template.
To duplicate or achieve the template you just need to hover over the template with your mouse and a 3 dots icon will appear in front of the template. Click on it and duplicate and archive options will appear.

If you achieve a template it will be saved in the template archives. To access them just click on the "Archive" tab on the top of the page. There you can restore, preview, or delete the template permanently.

If you choose to duplicate the template, you will create a copy of your template with all the same content and settings.
2. Create and edit templates
2.1. How to create a new template?
To create a new template you must first create a folder or, if you already have folders created, enter one. This is because you can only create templates inside folders.
To create a new folder, simply click on the folder icon in the top right corner and give it a name.
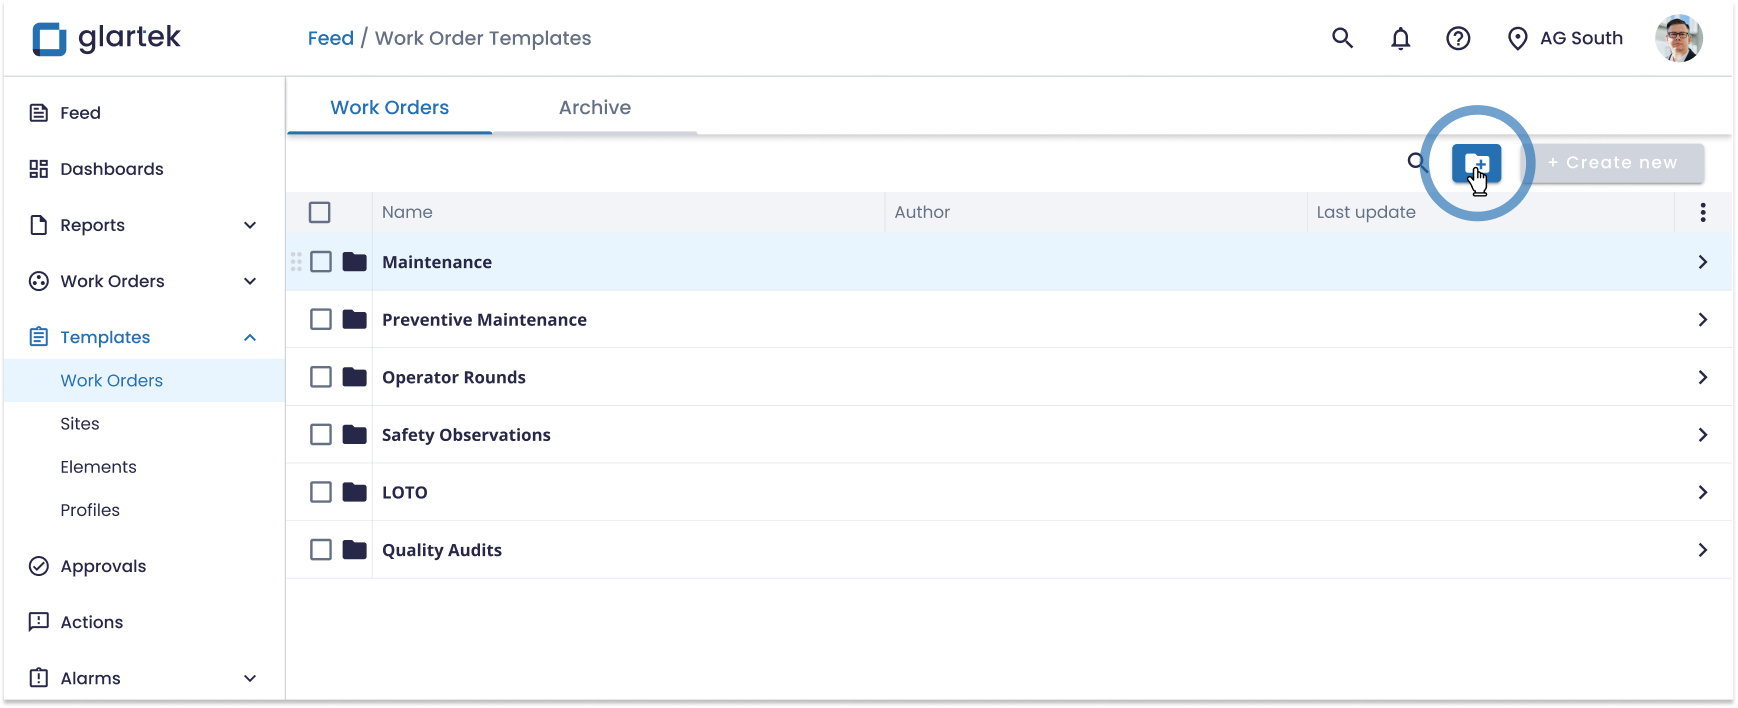
Then, when you enter the folder you've created or a previously created one, just click on the "Create New" button.

A new window with a template builder will open where you can edit the template title, create tasks, add questions and instructions, and configure other template settings.

2.2. How to edit a template?
Start by giving a name to your template. Click on the title field and edit the default name.

You can then activate the work order header by clicking on the "Work order header" button.

When you click, a new box will appear on the right side where you can insert additional information that will appear before the work order starts. You can add, for example, the expected duration of the work order.

You can also add questions or instructions to the header by clicking on the green button " + ".

Note: This questions are not part of the work order execution itself. They are just an optional component of the work order header.
2.2.1. Create Tasks
To start creating the work order main body, you need to create tasks or task groups. To create a task click on the "Add task" button.

A new task will appear. Edit the task title on the right side of the screen.


Note: All these settings are optional.
Add Rules
To identify or filter your tasks you can define task rules so that a task only appears when the filter is applied and meets exactly the requirements of the task.
Example: To see the tasks associated with a particular model and year of tool used, you can do so by filtering by the model and year that you want.
To define rules, click on the "Add rule" option inside the task header.

Then, a side menu will appear where you can select which labels you want to use as task rules.

Note: If you check the "include all remaining labels" option, it will select all the other hypotheses of existent labels excluding the groups that are configured on the side menu.
Add Tools
You can add tools to a task by clicking on the "Add tool" option in the task header.

After having added tools, you can associate them with each other. This way, when one tool is verified and booked during a work order execution the same will happen simultaneously to the associated tool.
Note: The association ensures that the state of both tools goes from "Available" to "In use" status at the same time, to prevent being used or booked for other work orders.
In the tools table, go to the "Associate with" column of the tool you want to associate and click on the drop-down selection menu to choose the tool you want to associate with it.

Choose the group in which the other tool is located. Then, select the task where it is. Finally, select the tool to associate with.

Check the box in the column "Reservation at Start" to automatically book both of the associated tools at the same time when the work order starts.

2.2.2. Create Task Groups
Instead of creating individual tasks, you can group them together for better organization of your template.
To create task groups, simply hover your mouse over the task area and click on the " + " icon with the description "Add Group" that will be displayed.

Then you can simply start adding tasks to your groups by clicking on "Add task" within the desired group.

Note: If you want to add more task groups, just hover your mouse between two groups, or at the beginning or end of the groups list and a "+ Add group" icon will appear.
You can change the view of your template to the group management view by clicking on the "Manage groups" icon.

On this page, you can also add groups by clicking on the " + Add Groups" icon.

You can change the group order using the drag-and-drop system by clicking on the corner icon and moving the group.

By clicking on the 3 dots icon, you can also access the settings of each group and collapse them.

You can also click on a task within a group and edit its content and settings directly in this view.

2.2.3. Task Settings
On task settings, you can define your tasks as sequential and indicate the AR definitions for the tasks.
Sequential tasks
Sequential tasks are tasks that have a sequential order where a task can only be executed if the previous one has been completed.

AR Definitions
You can define if you want to use the AR default settings (already enabled by default) or if you want to customise the number of markers to show.

2.2.4. Add questions and instructions to tasks
You can add questions within a task to collect information from the operators that will execute the work order and add instructions to guide them step-by-step.
Different response options that can be used. Your choice depends on the process you are creating, which information you want to collect, and which instructions you want to give.
Note: You can use different types of data inputs within the same task.
To add a new input click on the green " + " icon.

By default, it will create a text question.

But you can easily change the response option. Just click on the field where the response option is and a dropdown menu with several options will open. Choose and click on one of them and the response option will change.
To know more about response options click here.

Choose and click on one of them and the input will change automatically.
Note: For the "Selection" question type, you can then choose to customize the answers according to your preferences by clicking on the "Customize response" button or choosing one of the preset response groups available.

Then you can edit the input. Insert the question or instruction in the title field.


A text box will appear where you can enter the description, edit the text, and even insert links and images.

In this case, where we are using a selection input with customised responses you can edit the responses. Just click on the response fields and type in your options. To add a new answer option just click "Add options".


You can then add more questions and instructions to your task and create more tasks to create your procedure. When your procedure template is complete, don't forget to save it.

You can then find it in the folder where you created it, ready to be used in the creation of issues. You can edit it again as often as you like.
2.2.5. Edit images
When you add images to your template, you can easily edit them directly within the platform with Glartek's image editor.
In the response options that allow you to add files, in this case images, simply hover your mouse over the image and an editing symbol will appear in the image's top left corner. Click on it to access the image editor.

After clicking on the edit button, your image will be opened in the image editor where you can customize it. You have several customization options to choose from:

- Adjust: Crop, Rotate, Flip Horizontally, and Flip Vertically
- Finetune: Brightness, Contrast, HSV, and Blur
- Annotate: Text, Images, Shapes, Pen, and Lines
- Watermark
- Resize

Once you have customized your image, don't forget to click on “Save” to keep your changes.
2.2.6. Define conditional answers
It is also possible to define conditional responses. In other words, if the user chooses a certain answer option, something happens.
All you have to do is select the conditional icon in front of each answer option and choose which condition you want to apply.

You have several options, such as finishing the issue immediately, answering a new question, going to a new task, failing the response, or requiring that an action or alert be created.
3. Template Settings
Within the template builder, you can access the template's advanced settings by clicking on the advanced settings icon. There you can find settings about:
- Divide time
- Customise labels scan
- Estimated time of the work order by tasks
- AR definitions on tasks
- Score on responses

To know more about how to configure all these advanced settings click here.
If you have any questions please submit a ticket to request technical support.